2 H.P. CYCLONE DUST SEPARATOR
- three16ths
- Feb 4, 2017
- 6 min read
Updated: Jan 17, 2021
After looking at prices for a 2 H.P. dust collector with a cyclone dust separator included, I decided to make my own cyclone separator. I had already made a smaller one for my shop’s canister vacuum, with great success, so I knew the process already.

I admit, I didn’t have a definite set of dimensions to go by. I just looked at pictures of different manufacturer’s models. Some of them had some dimensions. I ended up sizing mine somewhere in the middle of the range of the different brands.


Even though I guessed on all my dimensions, I will tell you that when the system was completed, the dust collection worked perfectly. When I tested it out, at least 99% the wood shavings and sawdust went into the barrel under the cyclone, and less than 1% ended up in the filter assembly. I couldn’t have been happier.


I decided on a 35” tall cyclone with the inside diameter of 6” at the bottom, and 18” at the top. I figured I’d use ½” plywood for the staves. My plywood was a full ½” thick, so that made the outside diameter at the bottom 7”. The circumference then is 7 x 3.14 = 21.98”. I randomly picked ½” (0.5”) for the width of the stave at the bottom. So 21.98 divided by 0. 5 = 44. That is the number of staves needed to make a full 360 degree circle. The top of the cyclone is 19” diameter, which becomes 19 x 3.14 = 59.66” circumference. 59.66 divided by 44 staves gives you 1.36” (1 23/64”) which is the width of the stave at the top. To find the angle to rip the staves at, so that they will form a circle, divide 360 degrees by the 44 staves. This comes to 8.18 degrees at each stave. You will cut half of that at each side of each stave, so you will want to set your blade at 4.1 degrees when ripping the staves.

To rip the staves you will first rip at least twenty two 2 1/8” wide strips (with the blade set at 4.1 degrees), at a length of 35”. Then put this strip in your taper jig to get your ½” at one end, and 1 23/64” at the other end. Flip the cutoff piece around and make the cut again for the second stave.


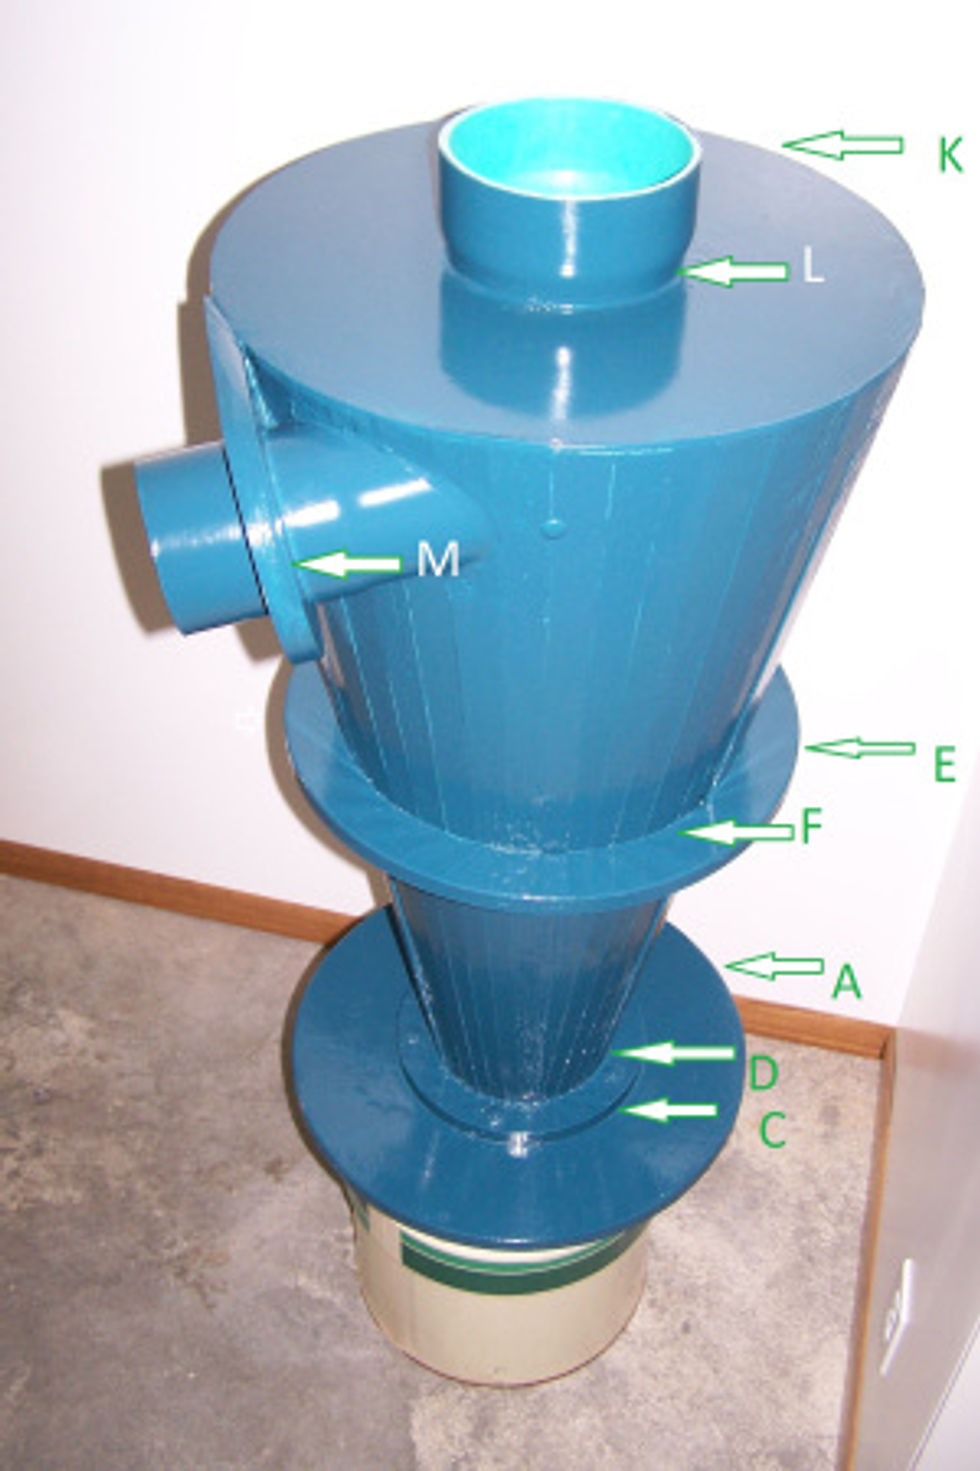
Now it’s time to make all your circles. Disc “A” is the base of the cyclone that sits on top of your trash can. Cut it to fit whatever size you need. Cut hole “B” in the center 6 15/16”. The waste from this hole wants to be a disc cut at 5 15/16”. This small disc is Disc “N”.

Disc “C” at 12 7/8” is the bottom flange of the cyclone during the glue-up process. Cut Hole “D” at 6 7/8” in disc C.
Disc “E” at 18” is the center support ring. Cut Hole “F” at 13” in disc E.
Disc “G” is the circle for the base of the trash can. I made two of these and glued them together to make sure that it would be plenty strong and not warp. I cut a groove “H” in the top of this disc that my trash can could fit in.

Disc “I” at 18” is the inside at the top of the cyclone. Cut Hole “J” at 6 5/16” in disc I.
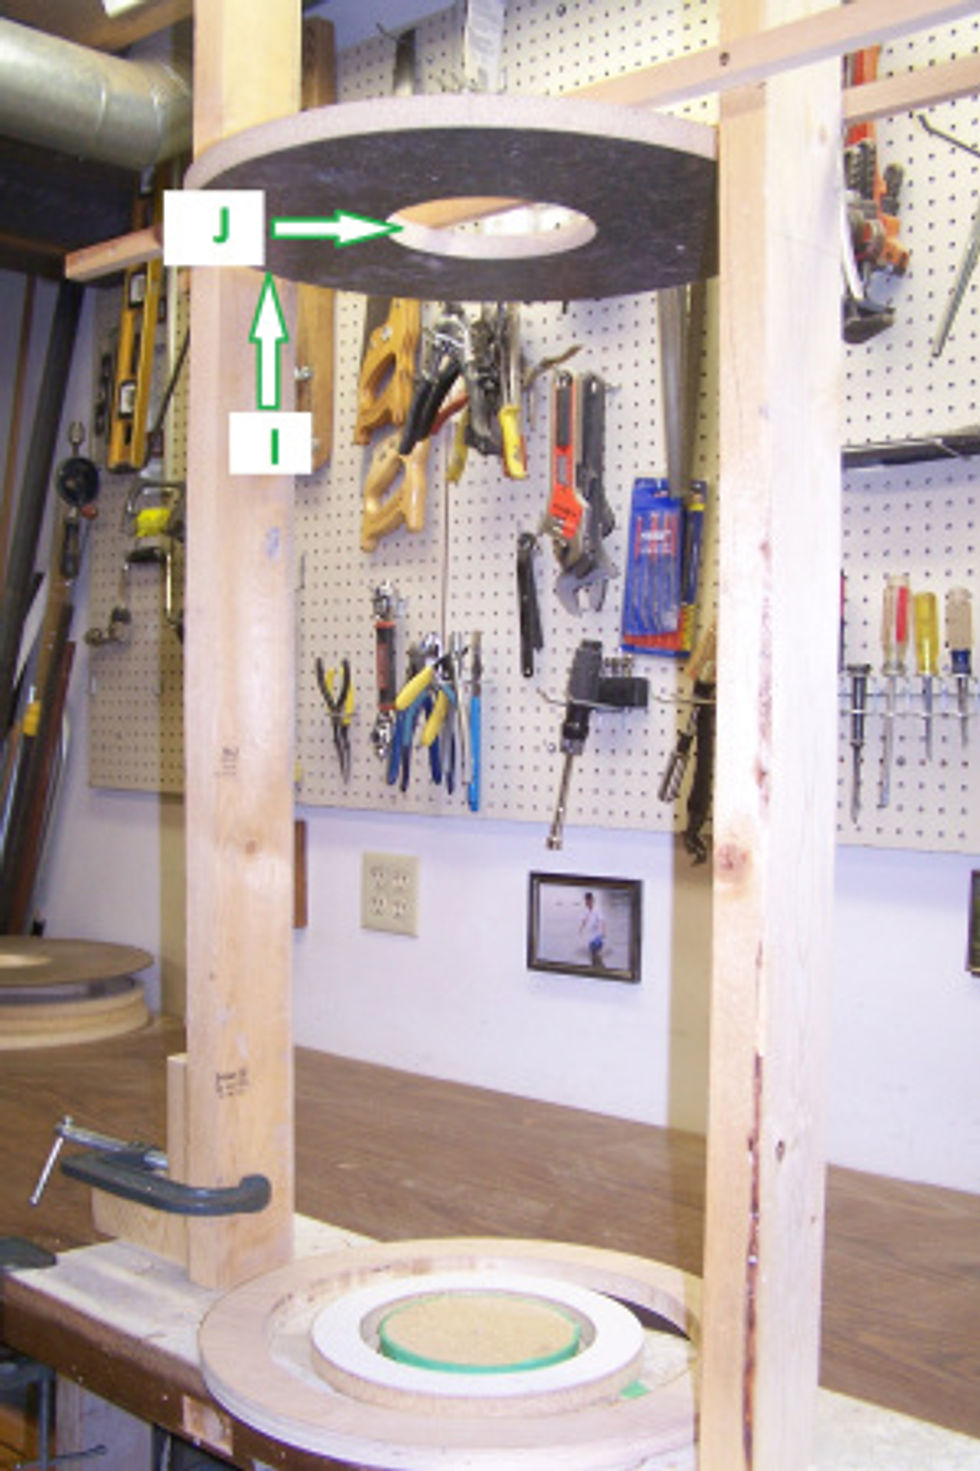
Using 1/8” Masonite, Disc “K” at 19 ½” is the top cover. Cut Hole “L” at 6 5/16” in disc K.
With a board at least 6 ½” square cut Hole “M” at 4 7/16” for supporting the molded coupling end of the 4” PVC.
With three boards over 4” wide by 13” long, screw them into a square using boards perpendicular. Then from this square, cut Disc “O” at 12” for the center inside temporary support. Another option instead of making this disc, would be to use a basketball to use as a center support. After glue-up is done, just deflate the ball, and remove from the top.


Now that all the discs are cut, you need to find out what angle the sides of the cyclone are at. If you are good at math, you could figure it out on paper. I just laid out the diameter dimensions and the heighth on my workbench, and used a protractor to find I had a 10 degree slope in my cyclone.

In hole D, hole F, and disk I, you need to cut the edges to a 10 degree angle.


With the exception of disc K, all the discs are ¾” thick. I used particle board, plywood and solid wood, depending on what I thought was best for each piece. Now that you are done cutting everything, save the mountain of sawdust so you can test out the system when you get done. As you begin to assemble the framework for gluing up, make sure you have disk C, disk E and a band strap in place at the bottom.

To prepare for glue-up screw a 2 x 4 to disc O, so that the bottom of disc O will be at the center of the cyclone. Make sure all the screws are on top of disc O so that they can be removed after glue-up by reaching in from the top of the cyclone with an impact driver. This 2 x 4 will be screwed from underneath disc N. Disc N will be screwed from underneath a temporary base used to support the temporary framework. Be sure to wrap tape around disk N and disc O so that they can be removed after glue-up. Or use the second option of placing the basketball in the middle. You will notice that I didn’t have disc O or the basketball in the pictures of the glue-up. I realized after building this, that I should have included this.

Frame up a support to hold the top disc I. Use spacers between the disc and the frame to allow room for the staves to extend above the disc 1/8”.

Before you start gluing up the staves, make sure you have a band saw, or something ready for when you have to trim some of the staves. Have it set up to cut at 4.1 degrees. It’s imperative that you will have to re-size some of the staves as you move around the circle. When you start gluing, you won’t have much spare time. Use weather proof wood glue that has longer glue up time.

When gluing up I used a small pinner to hold the top of the staves in place. As soon as you get the last stave in, pry up the bottom disk C with a flat bar, as tight as you dare. Now pull up disc E with clamps. Next use a band strap at the top. You may need to wrap wax paper around the top first, if you are concerned with glue ooze-out getting on your band strap.


After the glue has all set up, I used a portable belt sander to level off the staves at the top.

Glue disc K on top, using disk A as a firm support for clamping. After the glue is set up, use a pattern bit in a router to trim off the excess 1/8” Masonite.

Now you can glue and bolt disc A to the bottom of the cyclone. When cutting in the inlet you must make sure the air flow matches the direction of air flow in the blower unit.
Take your time and cut the hole in the upper side for the 4” PVC. Use the board with hole M to help support the PVC at the molded coupling end. I supported mine from the side of the cyclone, which cause the PVC to hang at a 10 degree angle. I should have supported it from the top so that it would have come out straight. Use two part epoxy and panel adhesive to seal the penetration and support the PVC.


My 2 H.P. blower inlet was sized good for the coupling end of 6” PVC. I extended the 6” PVC down 9 ¾’ inside the cyclone. Again, I just guessed judging by pictures of other cyclones. Use epoxy to set this in place.

Painting the entire finished cyclone with a thick primer and a good coat of paint will seal all the seams to make it air tight. The air is sucking in here, so it’s good to get a nice skin coating on the outside. Be sure to paint the underside of disc A to help prevent warping.


Comments