HARP
- three16ths
- Mar 25, 2018
- 6 min read
Updated: Jan 17, 2021


After seeing someone come to our church, eight years ago, with a small harp, I got the idea in my head that I’d like to build one someday. Now that I am retired, with more free time, and having acquired more power tools in my woodshop, I finally decided to get started on it. The thing that really forced me into starting this project was when I got some large free slabs of walnut. They were so big, and my shed was already getting filled up with too many logs and planks, that I realized that I needed to start using up some of the wood that I was hording. I purchased some plans for a 30 string harp from Sligo Harp. I’m not going to show you all the work involved in building the harp. I thought I would just point out some of the challenges I incurred while building this.


You want to lay out the patterns for the pillar and neck on the planks to find sections where you can avoid knots and cracks, in the wood.


The pillar can be formed from a solid piece of wood.
The neck has a lot of stress on it from the pull of the strings. This stress can cause the wood to split at the narrowest portion of the neck. There are several ways to strengthen the neck, so this won’t happen. I chose to laminate the neck with three equal thicknesses of wood. The middle section of the neck has the grain running in the direction of the force from the strings. This eliminates the chance of the neck splitting.


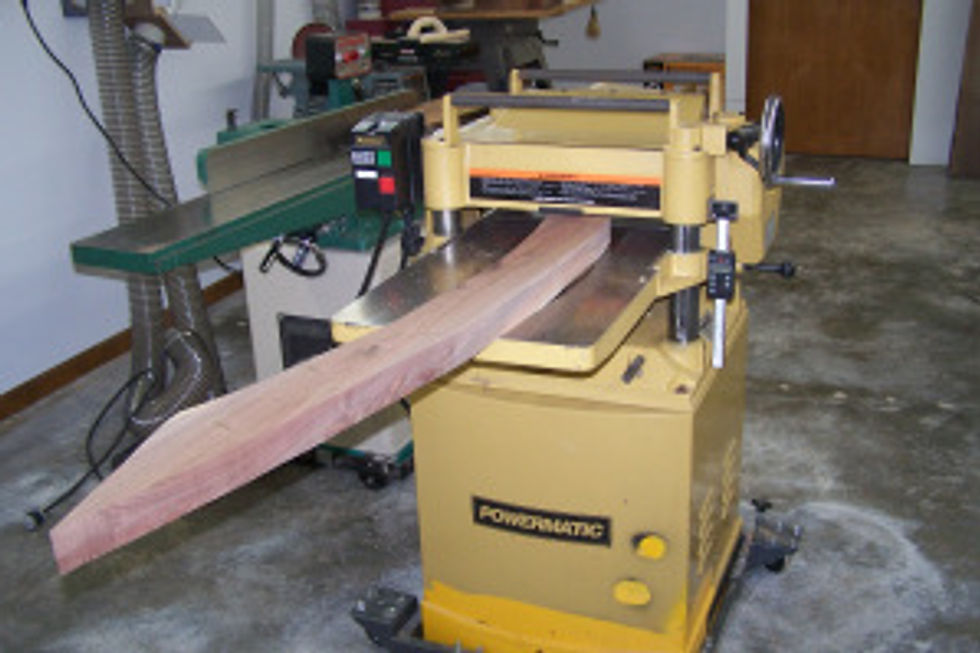
To make the curved back on the sound box you make ten staves 5/16” thick. One of the walnut planks that I was using, was warped very bad.

Using a good band saw, you can resaw the wood 5/16” thick, following the curve of the board.


Go ahead and sand the boards down to 400 grit, on the outside, at this point.


After cutting the staves from this, it is easy to force the 5/16” thick staves to flatten out.


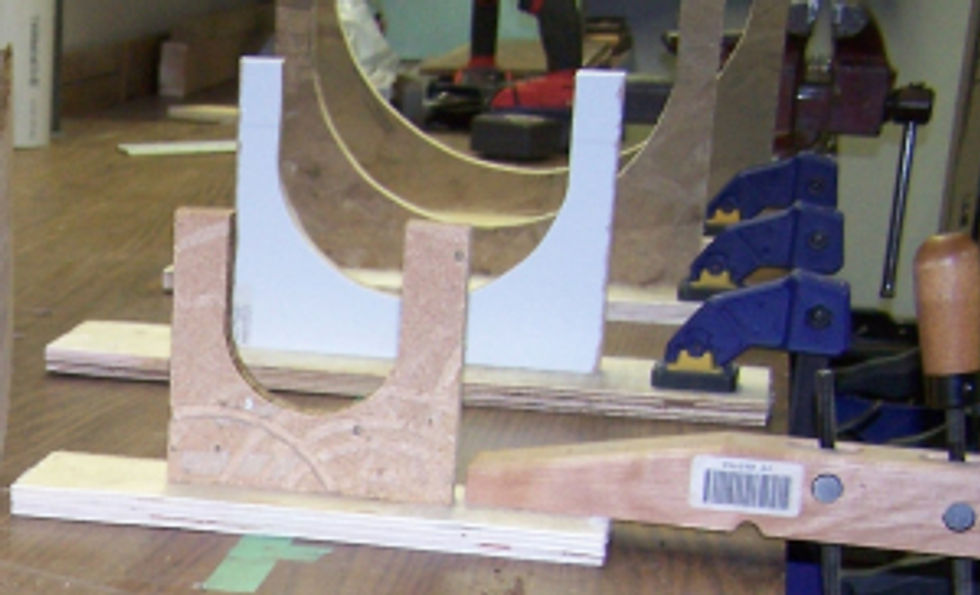
You want to cut the staves about six inches longer than the final length will be. My final soundbox length was 40 ¼”, so I made the staves 48” long. On my harp I wanted the top of the soundbox to have a 3 ½” diameter. The bottom was to have a 14” diameter. For gluing up the rounded soundbox, I made 4 cradles for clamping the staves to the proper shape. One cradle for 14” diameter. One for 10 ½”. One for 7”. One for 3 ½”.
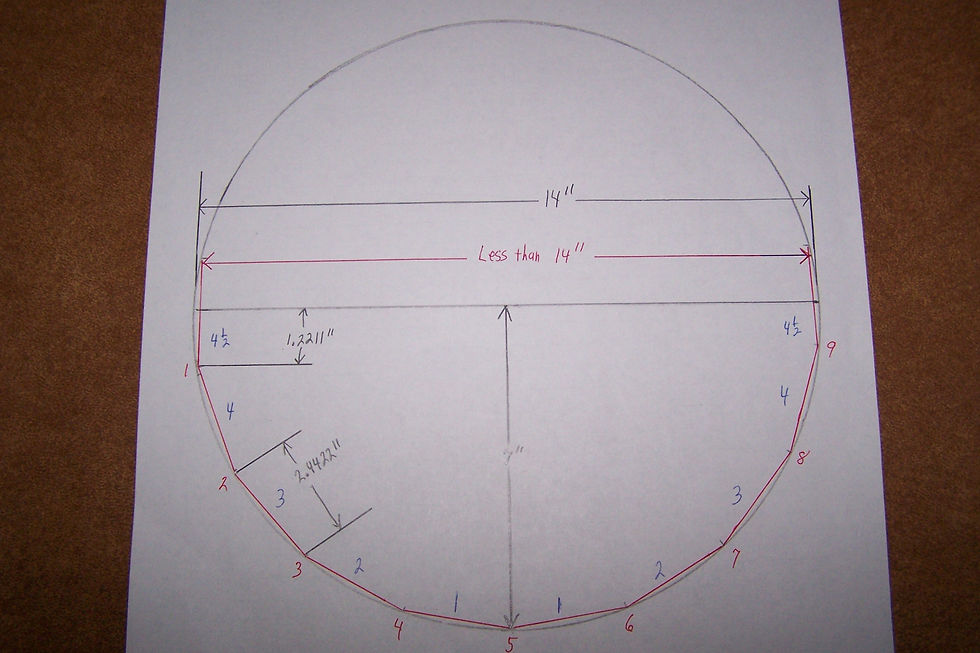
I want to use 10 staves to make up my half circle. But I want the staves at the front of the soundbox to be perpendicular with the front of the soundbox. There are several reasons for this which make it easier to build the soundbox, plus it will look better this way
With 10 staves, you will have 9 edges glued together to form half of the circumference of a circle. Each edge glued together will be made up of two equal cuts. That means there will be 18 beveled cuts in 180°. So 180° divide by 18 equals a 10° bevel cut on each side of each stave.
To find the width of the staves at each of the cradle positons, use the formula: Circumference = πD. However, we are only making half of the circumference, so our formula will be: ½ C = πD ÷ 2. To find the width at the bottom 14” end, that would be 3.14” x 14” ÷ 2 = 21.98”. We are using 10 staves. However only 8 full staves and 2 half staves are inside the half circle. So this totals 9 full staves. Thus, 21.98” ÷ 9 = 2.4422”. To ensure to make the staves right, you must use a digital caliper.
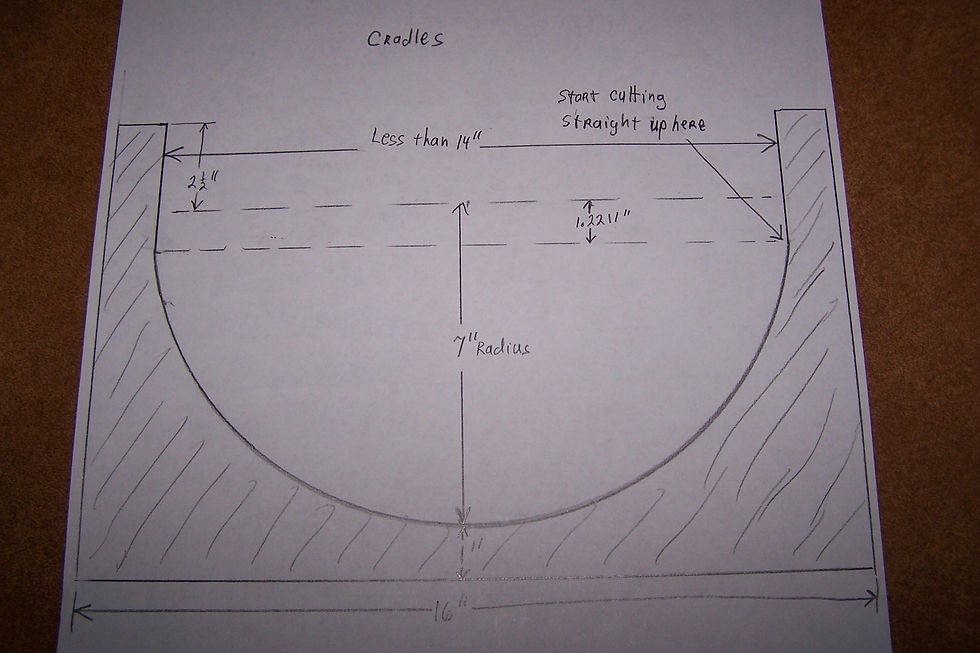
When cutting out the circle on the cradle, you need to stop cutting the arc at 1.2211” below the 7” radius point. At this point you make the cut perpendicular to the base. This will form the top stave straight up when you clamp it during glue-up. Use these steps for making all four cradles.
Make a taper jig for cutting all the staves. I made my taper jig for a radial arm saw. I like that method the best. However you can use a table saw jig also. I strongly suggest you form up a test sound box with some plywood first, to make sure all your cuts are correct. When gluing up the staves, I suggest using the weatherproof wood glue because it has a longer assembly time.
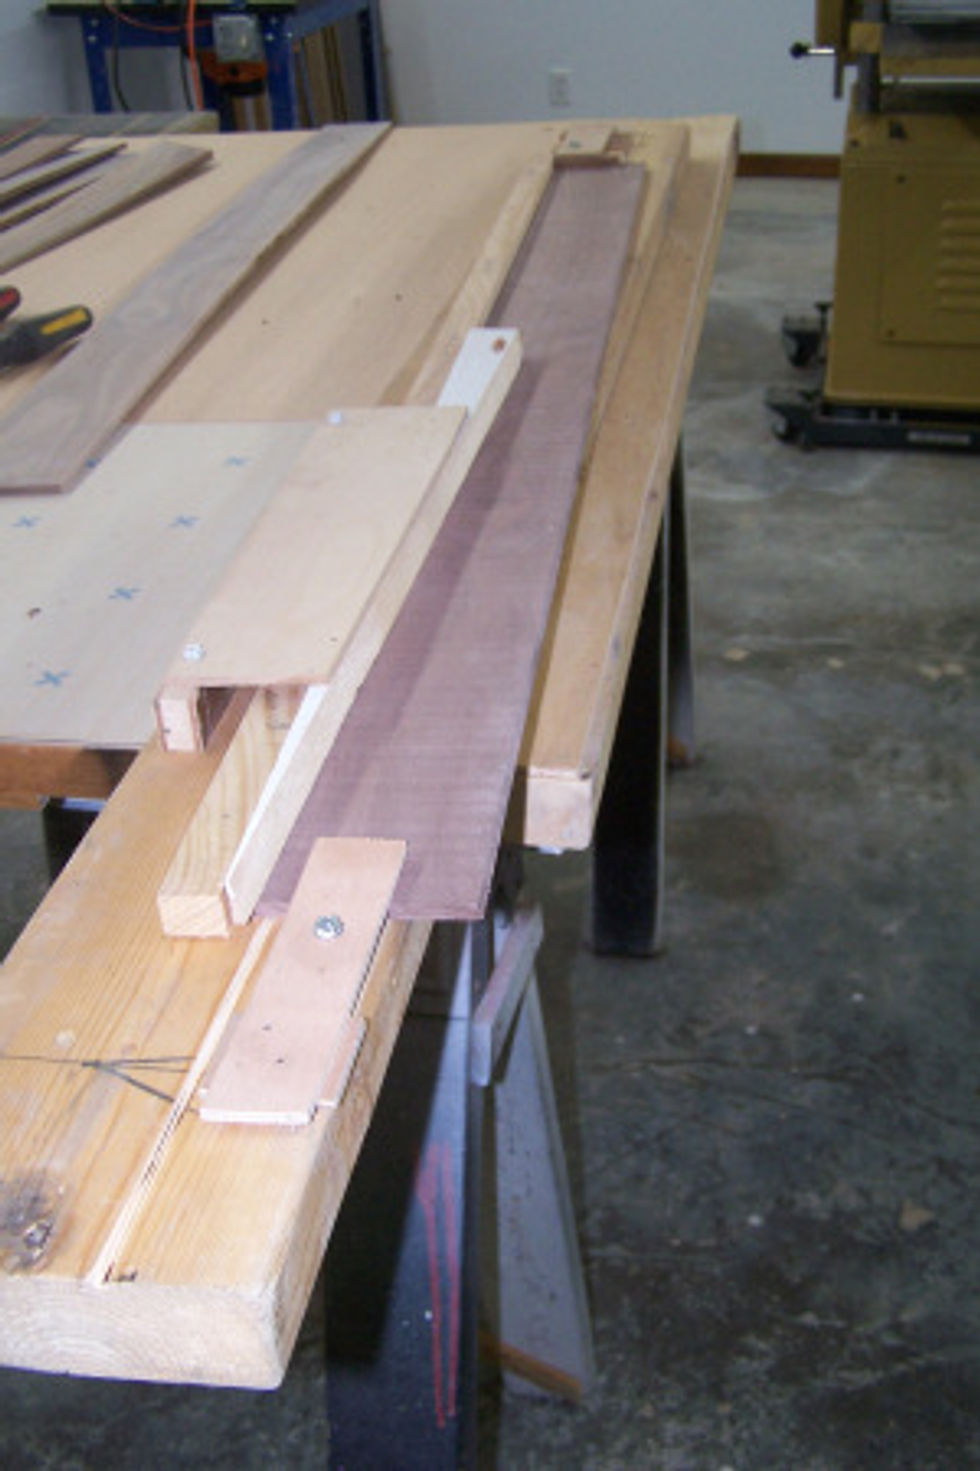
To glue up the staves, lay it out flat with the good outside facing up. Using clear packaging tape, (and a second set of hands) tape the staves up tight together. Then flip it over and fill glue in the bevels. Then set it in the cradles and clamp it down.


After gluing up the soundbox staves, you will need to make the top, bottom and one other brace for inside the soundbox. Use a solid length of electrical wire to make a form to start with the inside brace. There is no easy way to shape these braces because the angle of the cut changes since the entire box is at an angle. You will just have to start cutting large, and just keep hitting the braces with a disc sander to gradually get them to fit. You will never get a perfect fit, so you will want to use epoxy, to glue these in, because of all the large gaps you will inevitably end up with.


You will need to make a jig to hold the top and bottom braces at the proper angle and placement.


Stain the braces and the inside of the soundbox, because it does all show through the soundbox holes.

For making the actual soundboard you need a soft wood to get the right resonating for proper sound. I used a 2 x 6 cedar to make mine. The board has some specifications you need to aim for. It can’t have any knots. Quarter sawn is best, or Rift sawn will do. Look for a minimum of 10 growth rings per inch. The more the better. Pay attention to the colors on the wood too.


Temporarily attach the soundboard, tape two layers of cardboard along the staves so that when using a pattern router bit to trim the cedar soundboard down, the cedar will be just a little proud along the edge.

There are many ways you can choose to mount the finished soundboard to the sound box. I chose to screw and glue a 3/16” thick trim board, using recessed flat-head screws every 3”, to a backer board that I put in the staves. There is a tremendous amount of force pulling on the soundboard, so this is a critical part of the assembly.

After that I glued a 1/16” trim to cover up the screws. Then use a sander to finish sanding the cedar flush with the edge.

Before attaching anything together, drill all the holes for all the hardware and strings. When drilling the holes for the tuning pins, use a bit just barely big enough to let the tapered tuning pin go through the neck without the tuning pin flaring out the wood on the string side of the harp. I considered several ways to attach the neck to the pillar. I went with using hidden, double ¼” splines. You must be sure to orient the grain on the splines to run across the width of the spline.


To glue this together make a set of clamping cauls. You will want to use one screw to attach the cauls to the neck and pillar to prevent them from slipping during glue-up. Afterwards fill the screw holes with a sawdust / glue mix.

When making the final cut on the pillar, to attached it to the base of the soundbox, you will note that the cut needs to be made at a 1° angle sideways. This is because at the base, the pillar is in the center of the soundbox, but the neck is off to the side at the top of the soundbox. To my surprise, I found out that the neck is supposed to just fit loose on top, with dowels, for movement.

To attach the pillar to the soundbox, I chose to install a 5/16” t-nut in the pillar. I felt this would be the easiest way to bolt it together with the cramped space inside the soundbox. After epoxying the t-nut in place, find a matching piece of wood to cover up the hole in the pillar.


As I went along I sanded everything down to 1,000 grit sandpaper. Six coats of wipe on polyurethane gave it a glass like finish.


Lots of jigs were made to make this harp. Sometimes you spend more time making the jigs than you do making the cuts.


Comments