BEADS OF COURAGE BOWL
- three16ths
- Dec 21, 2020
- 2 min read
There are many ways to making a bowl. I wanted to try out a new method.

I gathered up lots of different colors of wood, for making a pattern in this bowl. I cut them at varying thicknesses. Some pieces I had to splice together in order to get the length and width that I wanted.


I wanted about 7 ½” square. I picked this size for several reasons. One reason being that this is a good recommended size for a beads of courage bowl. Another other reason is that some of the boards that I had picked were that size already. Lastly, I could smooth the pieces on my 8” jointer.
After coming up with a pattern, I glued these boards up to a 7 ½” tall stack. From past experiences, I will tell you to never get in a hurry and try to glue up too many pieces up at the same time. I have learned that just gluing two boards, or two sections at a time, is the best way to go for several reasons.

After the stack is all glued up, then with the bandsaw, I cut the stack into 3/8” wide strips.


The next step is to cut all the pieces into circles for the shape of the bowl. I prefer using a router circle cutting jig. It’s best to do this outdoors because of the noise and also you don’t have to worry about fiddling with the dust collection.
So as not to waste all of the inside round pieces, I cut another smaller diameter set for a second bowl.
I had to leave some circles solid for the bottom of the bowls, and I used a larger inside diameter for the top ring. This was for a lid that would fit in the top ring.

Stack the rings in order to visualize what kind of pattern you want.

Then start gluing all the rings together. Again I emphasize, it’s best to only glue up two pieces, or two sections at a time.

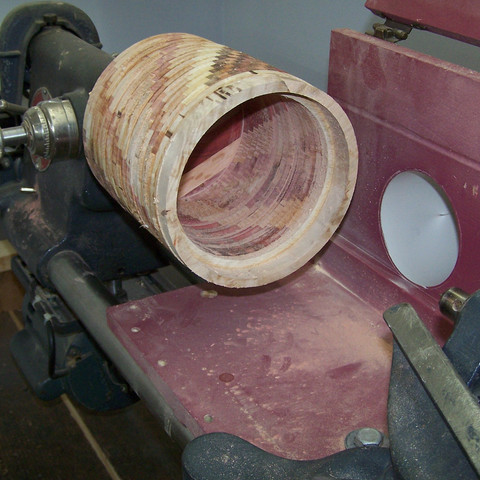
Even though, theoretically, you should have a perfectly even circle when gluing the rings together, there is considerable sanding needed to obtain a smooth bowl. So I mounted the bowl onto my lathe, so I could easily sand it with the bowl spinning. Before gluing the entire bowl together, I mounted the bottom half on the lathe, so that I could reach inside to sand it smooth. It would have been too hard to reach all the way in, with the entire depth of the bowl.

After the bottom half was sanded smooth, I glued the top half on, and finished sanding the inside of the top half.


The outside seemed a little too uneven to just sand, so I hit it with the chisel first.

This bowl was made specifically for someone that I became acquainted with, so I etched their name on the bowl and then painted in the letters.


Four coats of wipe-on polyurethane, and it’s ready to go.


Comments