MOXON VISE
- three16ths
- Feb 3, 2020
- 2 min read
Updated: Jan 10, 2021
After years of contemplating, I finally built my new workbench, along with the moxon vice.

I used three 2x6s for the stationary back of the vice. The reason I went with three 2x6s, was because I inserted a ¾” nut on both sides of the back section for supporting the ¾” all thread.

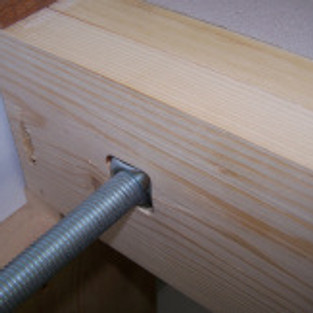


I used a palm router to recess the nuts into the front and the back. These nuts need to lay loose in the holes, so that they can shift out as needed when threading the all thread through them.


I sized the round handles to be a little shorter than the size of the vice, so that they wouldn’t interfere with a long board on the workbench. After drilling the 3/4” hole in the center, I routered out the recess for the nut. Then I rounded off the handle edges with a ¼” roundover bit.


For the handles, I inserted a 3/16” roll pin through the nut. This nut is epoxied into the handle.


For the movable face of the vice, I drilled a 1 1/8” hole and epoxied a section of ¾” pvc to act as a sleeve for the all thread to slide in.

I made the square plate to act as a washer for the handle to spin on.

On the inside of the movable face, I installed a washer and cotter key. This is necessary to keep the vice from racking when using the bench dog attachment.

I also put a cotter key at the end of the all thread, to prevent the vice from opening up too far.

I made an attachment for pushing towards a bench dog. I found I needed to bolt the attachment on to the vice.


Because of the loose fit in the ¾” pvc, the face would tip back when pushing against a bench dog. To compensate for this I ended up cutting the attachment into a wedge shape, that matched the tipping of the vice.


Comments